NLB and VMXNET 3 Adapters Preventing Shared IP Responses

Sometimes in the attempt to use Network Load Balancing on Windows Servers on VMWare, the VMXNET 3 adapter does not seem to allow proper responses from the Load Balanced IP address. Switching to different adapter type, ex. E1000E, everything starts to function properly.

Hopefully this helps someone else.

Example services: IIS.

Let’s Encrypt: Without Using Port 80 (Windows/IIS)

I wasn’t able to find quick and easy documentation for how to configure Let’s Encrypt with an ISP that blocks port 80. So, this is my attempt at hopefully saving you the time that I spent figuring it out for myself.

Unfortunately, I haven’t figured out how to automate updating my DNS TXT records just yet, so this will need to be done every quarter.

Also, this document was a quick write up, don’t currently have time to make it look as clean as I would like at the moment. My apologies.

In my example, I am preparing a wildcard domain.

First, you will need to download the ZeroSSL Let’s Encrypt client.

Next, you will need to open IIS and begin the process of requesting a certificate.

Click on Your Server in the left bar.

Select Server Certificates under Management.

On the Actions panel, select Create Certificate Request.

Common Name : *.domain.com
(The rest of the info is up to you.)

Click Next.

Select RSA and 2048.
(Or whatever you want to use.)

Click Next.

Save a copy of the key to the location below.

C:\cert\req.txt

Click Finish.

Update the command below with your domain and run it in an elevated PowerShell window.

.\le64.exe -key account.key -csr c:\cert\req.txt - csr-key domain.key -crt domain.crt -domains "*.domain.com" -generate-missing -handle-as dns -api 2 –live

You will be prompted to update a TXT DNS record for _acme-challenge.domain.com.

(Note, this is not a new sub-domain, you’re just updating the DNS of domain.com)

Example response from the command run above.

Host: _acme-challenge.domain.com, type: TXT, value: EDCerddvTxxxxxxxxx2alFy0_Ag8gDlSnMSzWC_ztI

Go to your DNS settings for your primary domain and add a TXT record with your value.

Update and run the command below in a new PowerShell or Command Prompt Window to verify the DNS record is appearing properly.

Nslookup –q=TXT _acme-challenge.domain.com

When you get the TXT DNS entry you entered back, return to the original elevated PowerShell window and press Enter to finish generating your certificate.

You can now return to your DNS settings and remove the TXT entry if everything proceeded properly.

Return to IIS.

Click Complete Certificate Request under Actions.

Select the file that was generated.

(It is where you ran your Let's Encrypt application, and you may need to switch to *.* to find it.)

Set your friendly name to *.domain.com.

You may need to update bindings or create new sites to attach this SSL certificate properly.

XenServer: Unknown Error Occurred Connecting with XenCenter

When connecting to XenServer 5.5 from XenCenter on up to date Windows devices, you get an Unknown Error. To fix this, we need to generate a stronger SSL certificate. The logs below show the errors and locations to verify that this is the issue.

I couldn’t find all of this information easily consolidated into once place and hopefully this will save someone time if they come across the same issues.

XenCenter Logs

Location: %appdata%\Citrix\XenCenter\logs\XenCenter.log

2017-10-17 13:05:08,154 DEBUG XenAdmin.Network.XenConnection [Connection to xxx.xxx.xxx.xxx] - XenConnection: trying to connect to 192.168.10.24
2017-10-17 13:05:08,661 DEBUG XenAdmin.Network.XenConnection [Connection to xxx.xxx.xxx.xxx] - The request was aborted: Could not create SSL/TLS secure channel.
2017-10-17 13:05:08,661 WARN  XenAdmin.Network.XenConnection [Connection to xxx.xxx.xxx.xxx] - XenConnection: failed to connect to 192.168.10.24: The request was aborted: Could not create SSL/TLS secure channel.
2017-10-17 13:05:08,661 DEBUG XenAdmin.Actions.Action [Connection to xxx.xxx.xxx.xxx] - The request was aborted: Could not create SSL/TLS secure channel.

(Source: Citrix: XenCenter Event Log)

XenServer Logs

Location: /var/log/secure

Oct 17 13:06:29 xen-105519 stunnel: LOG5[15145:3085974416]: xapi connected from xxx.xxx.xxx.xxx:55170
Oct 17 13:06:29 xen-105519 stunnel: LOG3[15145:3085974416]: SSL_accept: Peer suddenly disconnected
Oct 17 13:06:29 xen-105519 stunnel: LOG5[15145:3085974416]: Connection reset: 0 bytes sent to SSL, 0 bytes sent to socket

(Source:Xencenter 6.5 and 7 “unknown error” while connecting to XenServer 5.6.0)

Fix :

Through SSH or Console Access do the following
Verify the key is 512

openssl x509 -in /etc/xensource/xapi-ssl.pem -text

Because the file that generates it is read only, create a copy in the temp directory.

cp /opt/xensource/libexec/generate_ssl_cert /tmp

Use vi to edit the new file.

vi /tmp/generate_ssl_cert

Update the following line to look like the one below it by pressing i to insert text.

openssl genrsa > privkey.rsa
openssl genrsa 1024 > privkey.rsa

Press escape followed by k, then type !wq to write changes to the file and quit without prompting.

Backup the existing cert.

cp /etc/xensource/xapi-ssl.pem /etc/xensource/xapi-ssl.pem.backup

Stop the xapissl service.

/etc/init.d/xapissl stop

Generate the new SSL cert.

/tmp/generate_ssl_cert /etc/xensource/xapi-ssl.pem ‘hostname -f’

Start the xapissl service.

/etc/init.d/xapissl start

(Source: WebbosWorld: XenCenter Could not create SSL/TLS Secure Channel)

https://italcultur.com/

PowerShell: Disabling and Moving Inactive Users

While this isn’t my cleanest work, it did the job fairly well.

Also, I assume you’ve already added the Active Directory module, I believe command below will add it.

import-module activedirectory

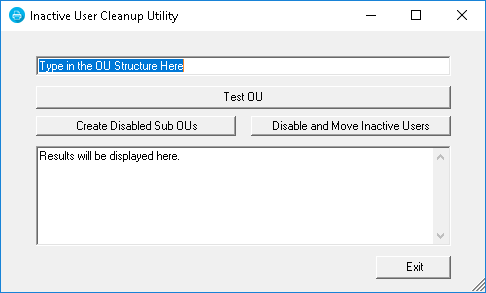
This script will go through an OU, searching it’s contained OU’s, find inactive users then disable and move them into their own ‘Disabled’ sub OU.

This comes in handy when you have a bunch of client sites that are organized and you want to maintain organization.

Foreach ($i in (Get-ADOrganizationalUnit -Filter * -SearchBase "OU=MyOU,DC=mydomain,DC=local" -SearchScope OneLevel | foreach { $_.DistinguishedName })){
    Echo "-------------------------------------------"
    Echo $i
    Echo "-------------------------------------------"
    ForEach ($xx in (Get-ADUser -SearchBase $i -Filter {LastLogonTimeStamp -lt $time -and enabled -eq $true} -Properties LastLogonTimeStamp)){
        [DateTime]::FromFileTime($xx.lastLogonTimestamp)
        Echo "XXXXXXXXXXXXXXXXXXXXXXXXXXXXXXXXXXXXXXXXXXX"
        Echo "Disabling User"
        Echo $xx.Name
        Disable-ADAccount -Identity $xx.ObjectGUID
        Echo "Moving User"
        Echo "XXXXXXXXXXXXXXXXXXXXXXXXXXXXXXXXXXXXXXXXXXX"
        $DisabledPart1 = "OU=Disabled,"
        $DisabledOU = $DisabledPart1+$i
        Move-ADObject -Identity $xx.ObjectGUID -TargetPath $DisabledOU
    }
    Echo "-------------------------------------------"
}

Below is a script that creates the ‘Disabled’ OUs.

Foreach ($i in (Get-ADOrganizationalUnit -Filter * -SearchBase "OU=MyOU,DC=mydomain,DC=local" -SearchScope OneLevel | foreach { $_.DistinguishedName })){
 echo $i
 New-ADOrganizationalUnit -Name Disabled -Path $i -Description "Disabled Accounts" -PassThru
}

Update


I combined everything into a PowerShell application as seen below and can be downloaded here.

Note: This application will only search through enabled accounts.

Terminal Server Gateways and PCI Compliance

Before starting, every Windows 7/Server 2008 R2 OS will need to have a specific patch (KB3080079) to be able to use TLS 1.1+ to connect to the Gateway properly after following the directions below.

To begin, download the IISCrypto software from Nartac onto the gateway server.

Upon opening, accept the agreement if it appears.

Click on the Templates section.

Select “PCI 3.1” in the drop down.

Click Apply.

Reboot the server.

It’s possible that at this point you might encounter and inability to connect and you’ll get the following error in the event log.

A fatal error occurred while creating an SSL client credential. The internal error state is 10013.

To fix this error, open the Control Panel, click Administrative Tools, and then open Local Security Policy.

In Local Security Settings, expand Local Policies, and then click Security Options.

Under Policy in the right pane, double-click System cryptography: Use FIPS compliant algorithms for encryption, hashing, and signing, and then click Enabled.

You may or may not need to run gpupdate /force